Fingerboard HQ
Would you like to react to this message? Create an account in a few clicks or log in to continue.


HomePortalFingerboard Bowl tutorial  Untitl12Rules + New Members FAQLatest imagesRegisterLog in

Share
 

 Fingerboard Bowl tutorial

View previous topic View next topic Go down 
AuthorMessage
Harlekin
FBHQ Beginner
FBHQ Beginner
Harlekin

Posts : 93
Join date : 2016-08-20
Age : 42
Location : Munich, Bavaria
Setup : main set-up: 30mm world creative, BR-trucks with orange bushings, winklers, fbs-tape
2. set-up: 31mm flaked, chinatrucks and -wheels with washers, BR-tape
3. set-up: 32 mm planktoon, chinatrucks and big winkler-like wheels,
fbs tape

Fingerboard Bowl tutorial  Empty
PostSubject: Fingerboard Bowl tutorial    Fingerboard Bowl tutorial  EmptySun Sep 16, 2018 8:30 am

i know, this is not the first pool-tutorial, but everyone has his own way to do this, so the more the better...
so this is my advertised "big project"happy

I saw this blocks (94cm/50cm) lying around at a local building lot and asked for one.
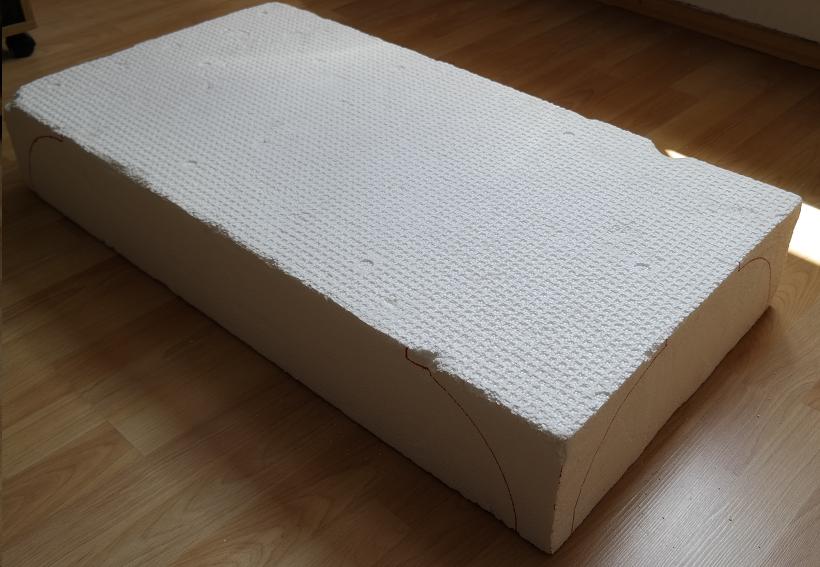
Fingerboard Bowl tutorial  _1020013
I was very excited, if I will be able to make a pool out of this
I cutted a curve of styrofoam, when I made my round curb, but this would be something entirely different. But the styrofoam was for free, so let´s get startet.
I had lots of thoughts, about what shape would be the best for me and I decided to realise a sunglasses-shape. whatever you choose, the process is similar.
1.make a cardboard-circle and put it on the left side of your block. Draw around and put it on the right side. how far depends on how big the hip should become.  take a round object which fits inside the hip and draw around again ( I took the inside of an adhesion tape roll). Connect the big circles and your sketch is finished.
2.take a steak-knife or something like that (it should have a saw-blade and should be a littlebit flexible) and cut a littlebit in the middle of a circle. This makes the blade warm and you can not damage something. Now bend it carefully (away from yourself, if it cracks).
Here you see the result (my secret weapon) and the ironsaw-blade
Fingerboard Bowl tutorial  _1020014
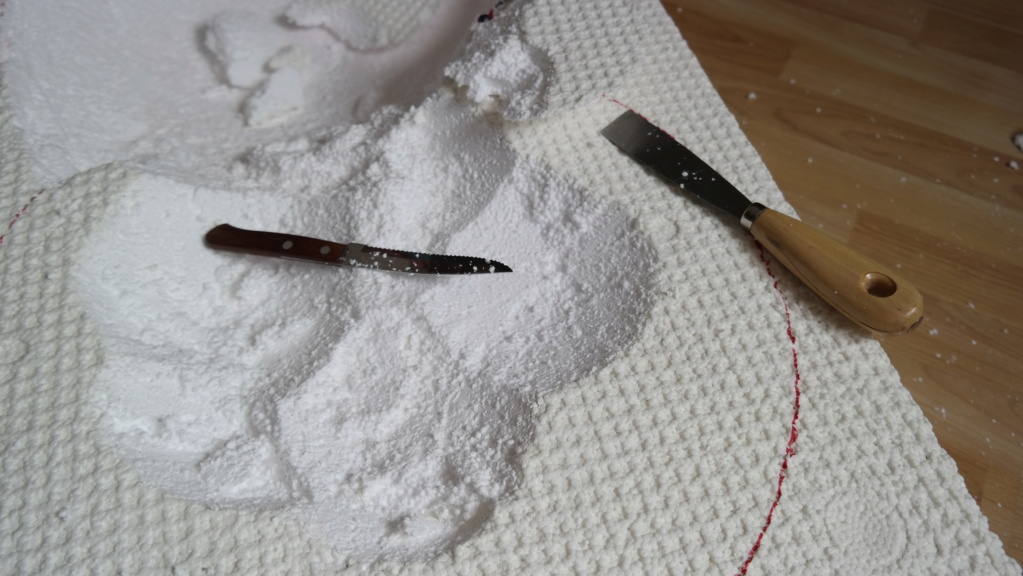
3. begin in the middle of a circle (the deepest point – you can´t damage something). stick the knife diagonally into the block and cut out clockwise a small funnel. Make another funnel, right beside it and further ones. Crack them out with a scraper. So you´ll get a hole.
Fingerboard Bowl tutorial  110
Fingerboard Bowl tutorial  _1010015
4.Make it bigger, by cutting slices (step by step) from the edge of your small bowl.  From this point keep the transitions in mind! I drawed the transitions on the outsides to help me with this (you see on the first picture).
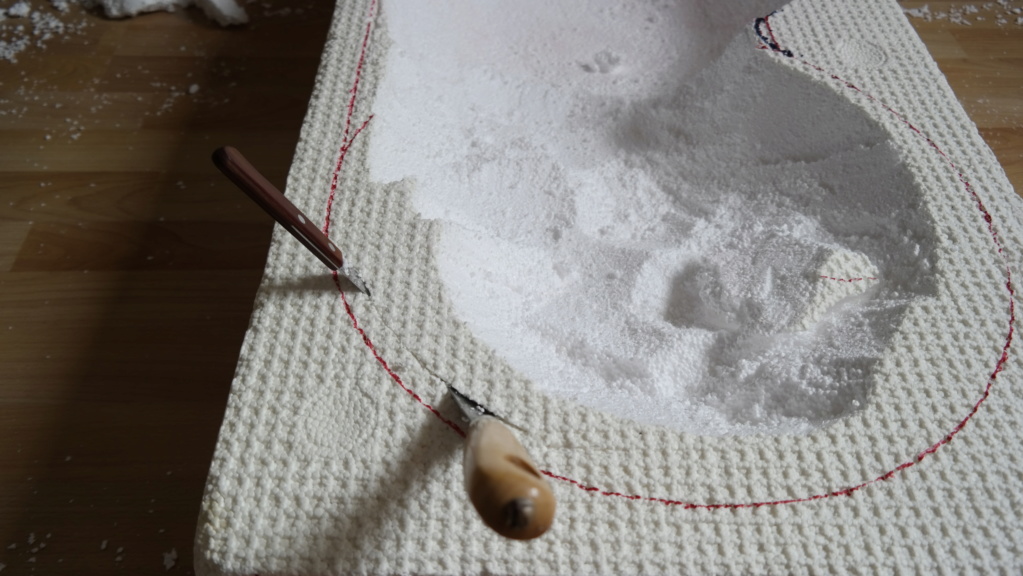
Fingerboard Bowl tutorial  _1010016
5. Make it bigger until you´ll have 1-2cm to the coping and ground. Then it´s time for the saw.
Fingerboard Bowl tutorial  Time_f11
6.You´ll see, how much space you have to the coping, but not to the ground – messure it, like this.
Fingerboard Bowl tutorial  _1010017
7.If it´s not deep enough, you can make it deeper by cutting horizontally with your knife to cut big pieces, or scrap with your bended ironsaw-blade (look on the next picture) on the ground.
8.To put the finishing touches on the first bowl, use the saw like this to cut small pieces off and to scrap it out, until you´ll get a perfect bowl.
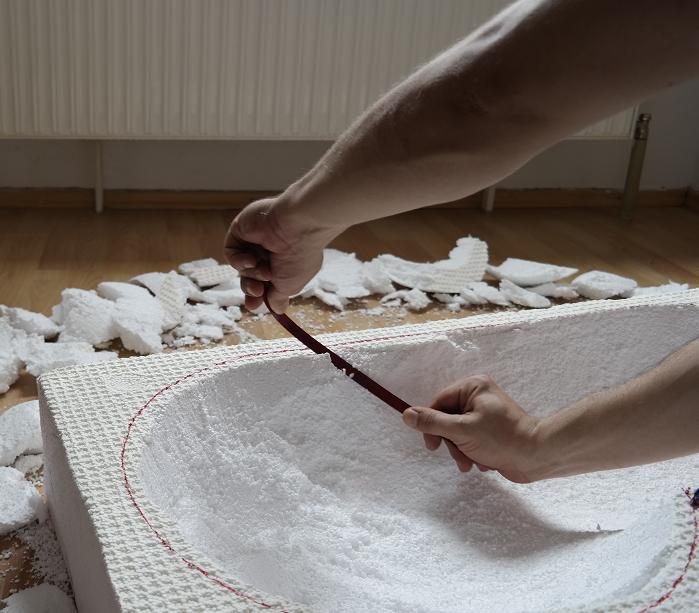
Fingerboard Bowl tutorial  _1010018
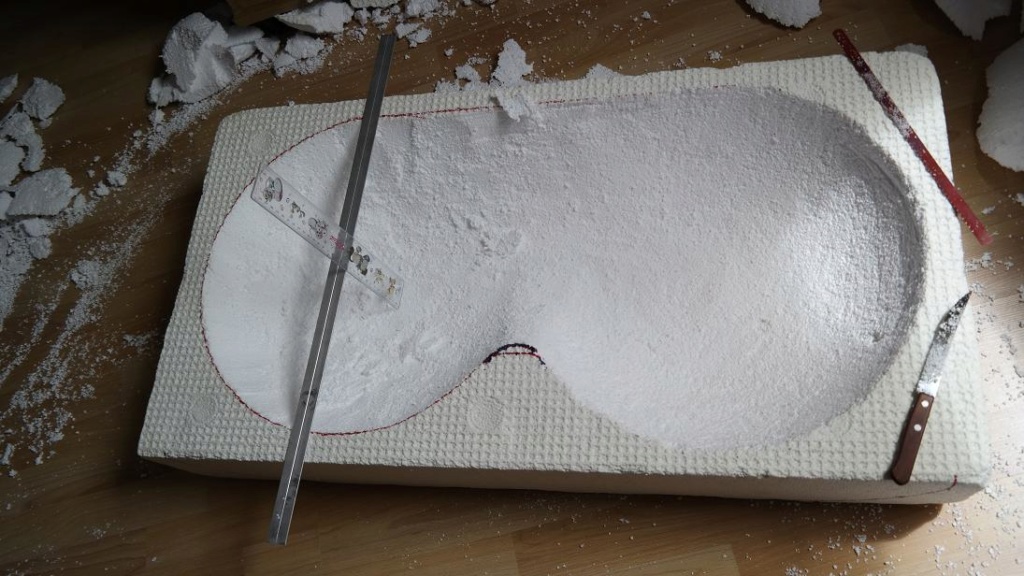
9. Do the same to the other circle. After that, shaping the connection (the hip) shouldn´t be a problem anymore.  Now it should look like this.
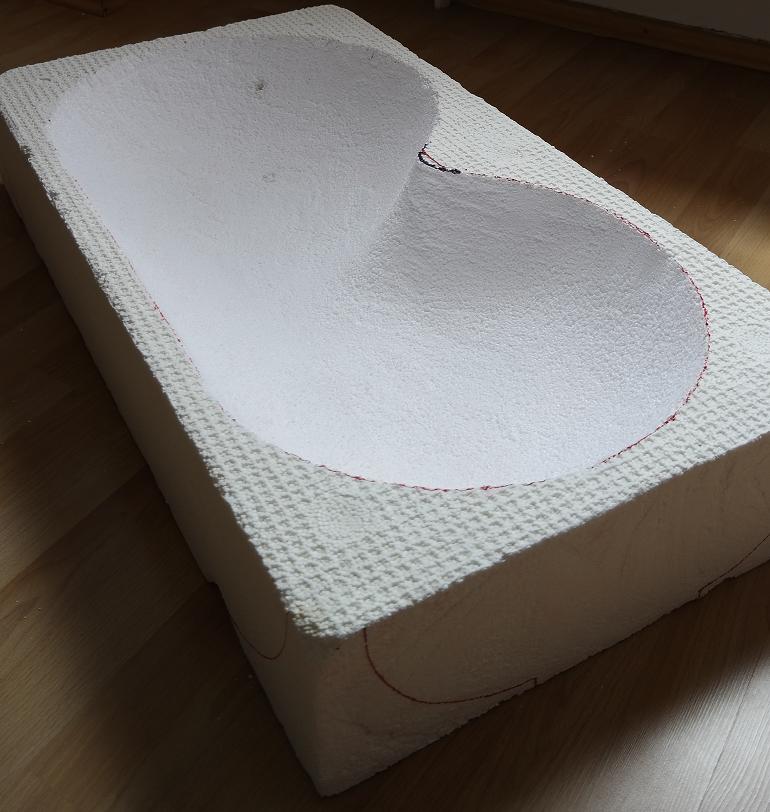
Fingerboard Bowl tutorial  _1020012
10.next step: the net. I used a trampoline-net, i found on ebay for only 1€ and fixed it with thumbtacks, because the small U-tacks that i had, popped out all the time.
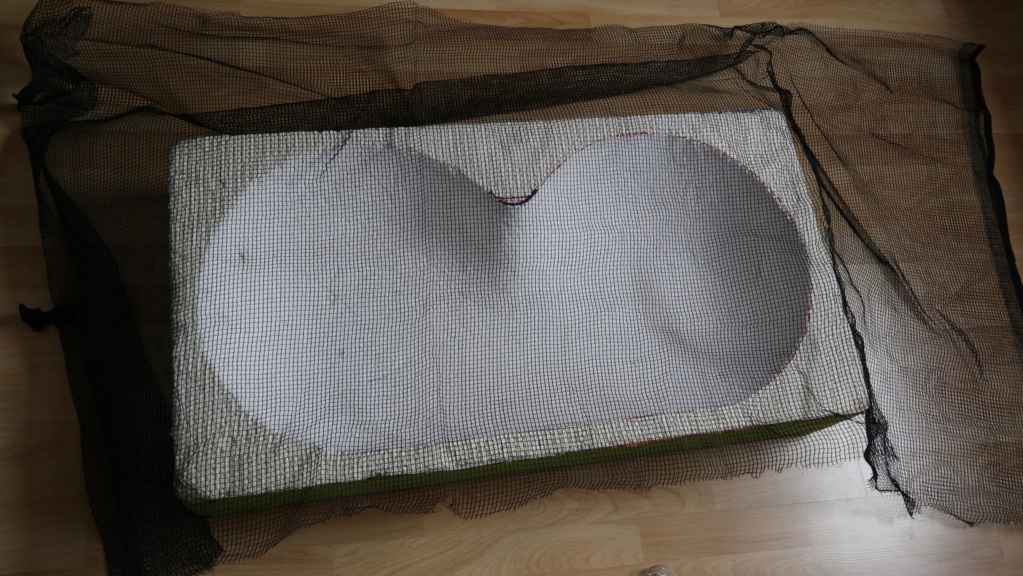
Fingerboard Bowl tutorial  _1010019
11.After that, I took about 8kg portland-cement and mixed it up with water(breathing mask!!!), until it gets a consistency, a littlebit harder than toothpaste (if you make it too liquid the cement will slide down the transition!).
12.Step by step, I shoveled it in and spread it with my homemade mean spatula (the cardboard negative of the transition). Fingerboard Bowl tutorial  _1010020
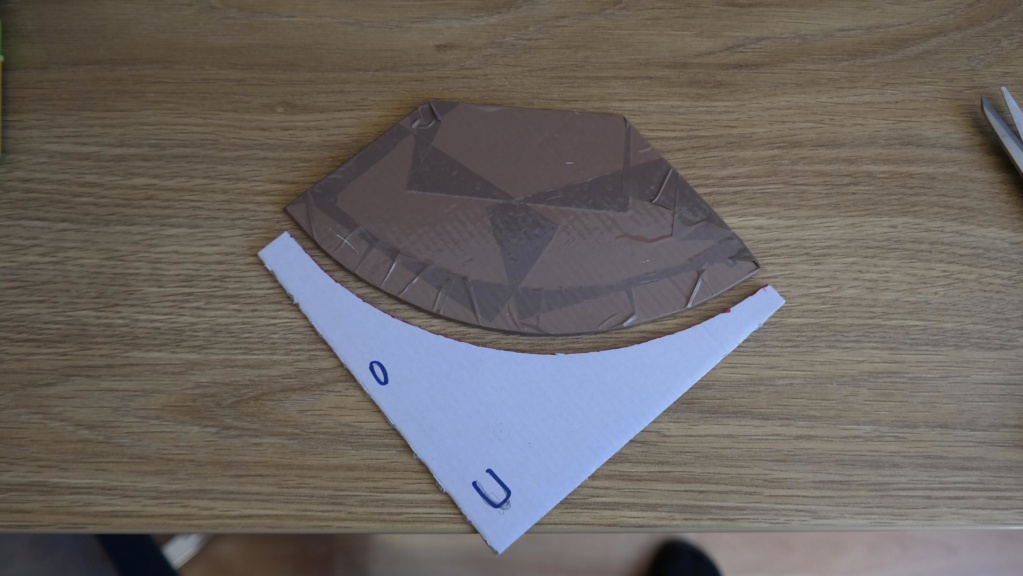
This is a littlebit like putting the cream on a cream cake. After about the half of the work, I could throw my spatula away. Good, that I made a second one! To make the top even/flat, I´ve used the iron spatula you can see on the 3. an 4. picture.  I tried to make all as smooth as I can, but it´s not possible to make it perfect at this point.
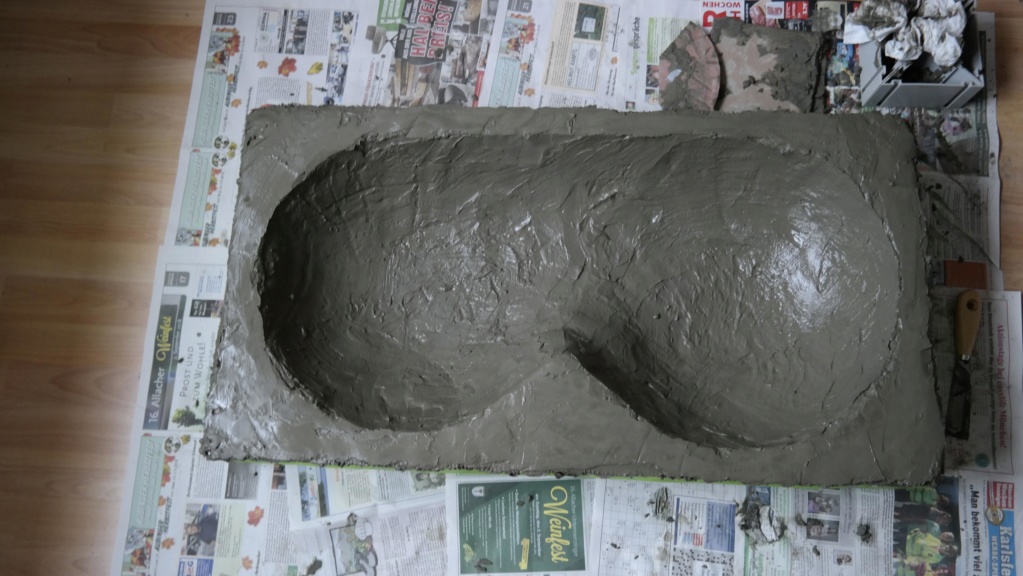
Fingerboard Bowl tutorial  Vollge10
13.After I finished the whole covering, I paused about half an hour, before I came back to work. Now, the cement was a littlebit harder, but still soft. I brought it back in shape at some spots (coping for example), and started to smooth it out.
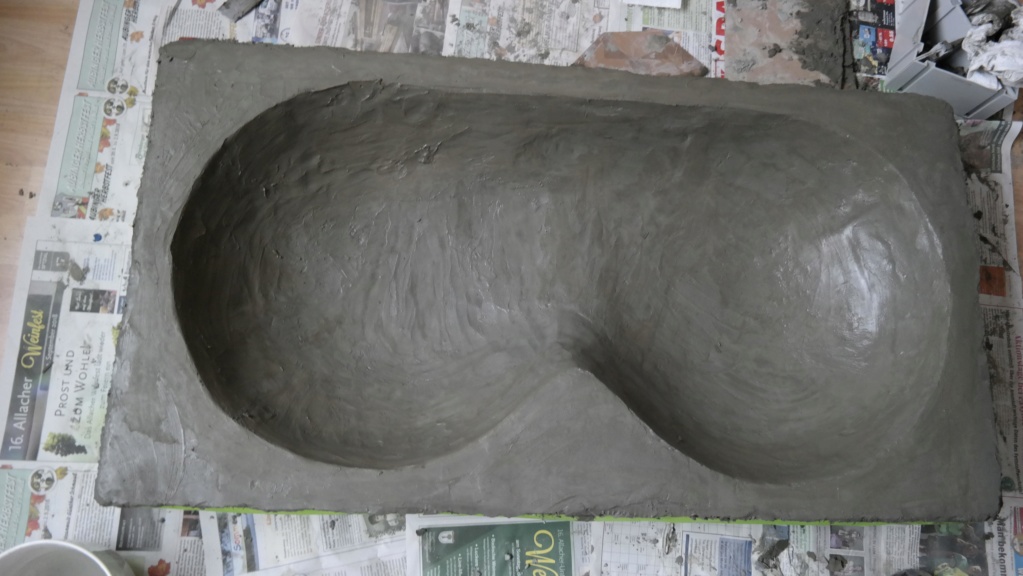
Fingerboard Bowl tutorial  1_x_gl10
14. First, I did it with a spoon (make it wet before, and again and again!), but it didn´t worked well enough for me. Then, I had the GREAT idea scratch to use my fingers (also wet). It worked really fine and the result was one day after, that I lost at least 1 layer of my skin on the hands over the whole day affraid  + 10-20 times creaming with lotion. Next time, I will definitely use latex-gloves! However, i smoothed it, as good as I can at this point, then 20 minutes pause and again, until I was happy with the result.
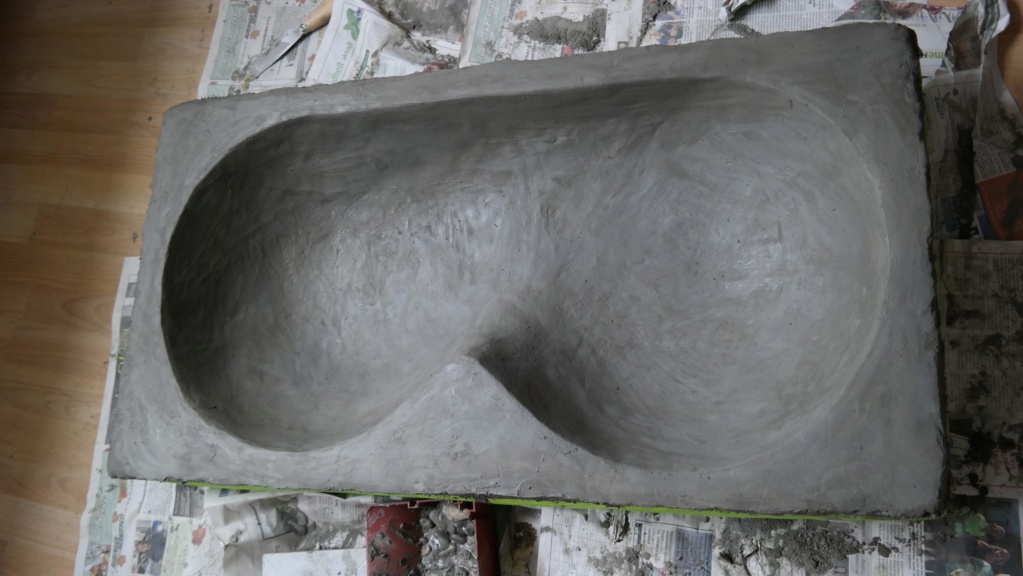
Fingerboard Bowl tutorial  2_x_gl10
15.After 3 days, the surface of the cement was dry and I did the sanding. Time to wait again, until it´s completely cured – I don´t know, maybe a 1-2 weeks?  But before, it was time for  test ride. It felt really good, but I noticed that the middle of the hip was too pointed, so that it grinds while riding it up. The problem was resolved quickly by sanding the spot with sandpaper again.
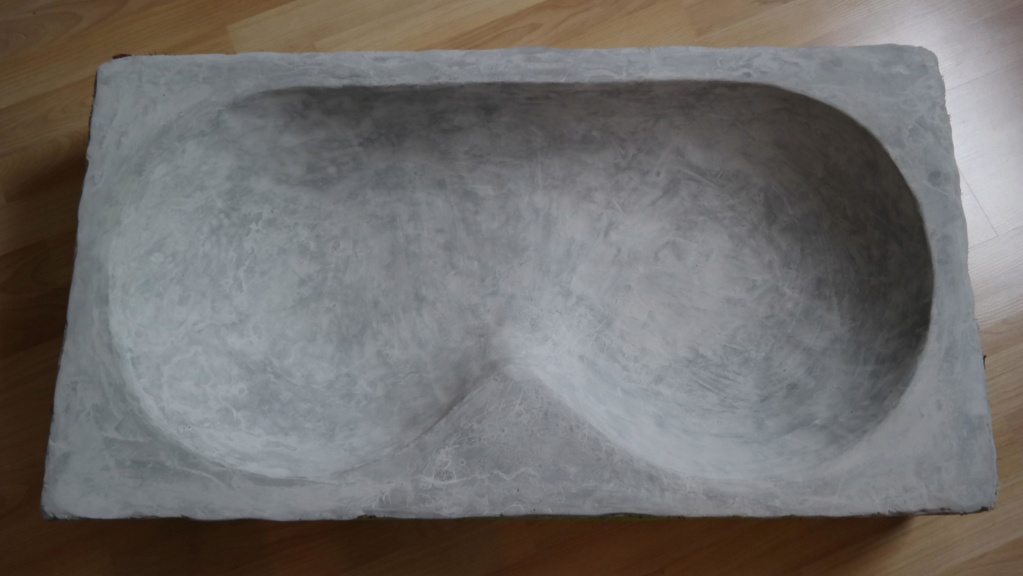
Fingerboard Bowl tutorial  Abgesc10
16. After that, I painted the whole thing (incl. the tape on the outside)  with Polyurethan clearcoat (have no creativity to do a graffiti at the moment). If you´re not broke like me sad , take a new(no color-reste!) quality(to prevent hair loss) brush for this. Here´s the final result. I know it´s not a beauty (at the moment!) and it has some fine cracks  but it´s smooth and really nice to ride!
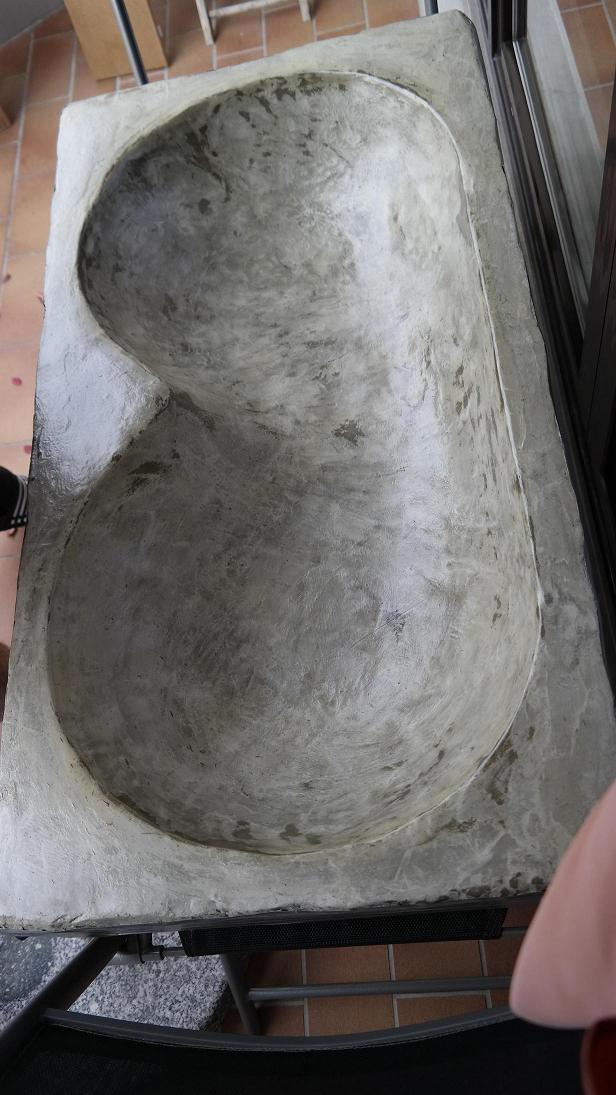
Fingerboard Bowl tutorial  _1010023
now, 3 days after painting it with PU-lacquer, i can say PU-lacquer needs a way longer to dry completely, than spraypaint  - it´s still stinking and changing the color (looks better and better).
this is important to know, to calculate with the weather!
Back to top Go down
skatemaster231
Moderator
Moderator


Posts : 1409
Join date : 2013-04-22
Age : 24
Location : internet
Setup : D͐̏̋̐ͣ̐͊́͂̈́ͨ̏̋ͥ̆͑ͧ͘͜҉̺̙̹̞̗͚̤̻̫̼̳͖͔̩̤̘͇o̚­­̱̰̳̟̟̞̜̖̬̌ͦ͌͂ͦ̎̅ͫ̑͂ͦͩ́̚͢ ̴̮͍̲̖̖̤̯͎͎͋̈́ͫ̂̊̇ͤ̆̓̌ͫ̐ͣͣ̆ͬ͌̚͡y̆ͪͫ̉ͭ̅ͫ͊ͩ́­­̨̛̬̠̰̙̫̮̪̟͈̯̘͎̗́̀o̶̶̘̝͇̜̝͓̞͉̰̫͚ͣ̽̄̀ͅu͗̊­̏­̷̡͙̜̳̠͈͕̹͑̿͌̓̇̽͂̄͋ͯ͂̍ͣ̂̓̀͘̕ ̣̳̭̝̻̣̤̫̣̠̦̙̦̲ͣ͂̃ͦ̑ͦ̃͂ͣ̓̇͒̈͘͠t͒̎ͯ͐͂͛̏̈ͦ̐­­̴̼̖̫̞͔̺ͧͭ̅͊̾ͣ͒́̚̚͘̕h̬̖̙͙̰͖̺͛̾̐̃ͦͪ̏ͧ͌̓͘̕­͙­̟į̶̻͖̠̟͔̟̦̝̜̞̄̇̏̂ͨ̋͂̕͟͝nͨ͌͊̓̆̾͛̏ͬ̑̎̾̚­ͭͮ­̵̌ͫͩ҉̶̵̰̫̩̲͕̱̗͚͇̰ͅk͙̳̳͓̟̝̠̯̝̔ͧͤͩ̾̀͢͢͠­͙̻͙­̻̱̼͖ͅ ͥͫ͒ͧ̏ͯͮ̓ͬͯ̾̽̈̀ͥ́̀͘͠҉͈̩͍͔̲͖͔ț̶̛̛̅͌̋ͬ͌̄͜͞­­͎̜̜̰͙̰̝̝̦̪̜h̸̥͎̰̤̼̱̝̜̭̹͆̾̈̓̌ͮ̎̅̄̅͋̋̔̿̚̕­͖­̱̗̗̪̫̻i̡̩̬̰̹̩͓̩̣̱̗̹͑ͧ̾̿̂̚͟͡ͅs̐ͤͭ̐ͫ͋ͮ́҉­̢͏­̳̦̠͕̠͈̣͕̫͔̫͖͖̹̗̟͢ ̴̠͓̺̩̩̙̬̬͈̼̭̰͖̱̺̣̗̫̉͂ͪ̔̍̀ͫ̀̎̏̔ͯ̌̒̒ͩͧ́i͛͋­­̸̄̂͊͋͗͑͏͙̙͈̦͎̥̰̕s͂̍̑ͫ́̇͌̑̿̒ͦ̓̊͛̚̚̚҉́̕͞͡­̞­̟̣̻̲̜̫̺͉̠̬̥̙̜̪̭ ̧̖͔͕̹ͧ̐ͦ̎̊ͧ̽ͨͦ̒͐̀͞͡ͅaͦͦ̅̐͐ͥ͂̓̋͒̔̄ͣͤ͂͂͆͊ͬ­­̨̛͈̞̪̖͓̣̫̰̠̤̖̠͉̪͔͟ ̡̛̱̦̗̫̯̻͓̭ͦ͒̐̒̆̇̉̀p̡ͤͮ͛ͫ͋̽̄̎̑͑̈̉̒͛̎͋̿ͮ̓͠­­͏͚̮̖͖̫̦͙͎̭̜͇̺̻̩̹̕r̴̵̡̟͖̫̝̘̜̝͇̙̦̍̆̃́ͦ̚͘͢­̝­̪̞o̷̧͔̪͙͓͔͓̞̘̺̟͇̳͎̦̩̣̻̩ͮ̅͊̉̽̄̍̋͐ͥ̓́͐̚͢­͓b­̡̥̞̳̙̠̞̘͉̼̤̘̝ͨͣ͌ͥͤ̍̓ͩ́̈́ͨ̅̓ͧ̅͢lͭ̿͂͛̄͐̈­͗̑̓­ͭ͆̉͋ͩ̿̋̇͡͡͞҉͔̼̻̣̝̜̭̖͕̙͈͓̖ͅeͣ̂ͭͤ͑̏ͬͨ̓­҉̨̖͞­̼̹͉̹͈ͅm̛͛ͦ̾̉̋́̊͐͐̂̐̎̄ͯͤ̚҉̡̻̳̤̥̪͎̹͜ͅ­͔͉̝͍̫­͖̺͓̬͙?̥̣̼͇̟̰̙͉̜̌̊̔ͬ̔̊ͩ̍̂̐̂͐̌̋ͩͩ͛́͡­̦̟̥̬̩͕


Fingerboard Bowl tutorial  Empty
PostSubject: Re: Fingerboard Bowl tutorial    Fingerboard Bowl tutorial  EmptySun Sep 16, 2018 8:21 pm

Ayyy nice bowl and tutorial! Looks like it turned out great!
Back to top Go down
Harlekin
FBHQ Beginner
FBHQ Beginner
Harlekin

Posts : 93
Join date : 2016-08-20
Age : 42
Location : Munich, Bavaria
Setup : main set-up: 30mm world creative, BR-trucks with orange bushings, winklers, fbs-tape
2. set-up: 31mm flaked, chinatrucks and -wheels with washers, BR-tape
3. set-up: 32 mm planktoon, chinatrucks and big winkler-like wheels,
fbs tape

Fingerboard Bowl tutorial  Empty
PostSubject: Re: Fingerboard Bowl tutorial    Fingerboard Bowl tutorial  EmptySun Sep 16, 2018 9:13 pm

thank you, bro! happy i hope it helps.
Back to top Go down
Harlekin
FBHQ Beginner
FBHQ Beginner
Harlekin

Posts : 93
Join date : 2016-08-20
Age : 42
Location : Munich, Bavaria
Setup : main set-up: 30mm world creative, BR-trucks with orange bushings, winklers, fbs-tape
2. set-up: 31mm flaked, chinatrucks and -wheels with washers, BR-tape
3. set-up: 32 mm planktoon, chinatrucks and big winkler-like wheels,
fbs tape

Fingerboard Bowl tutorial  Empty
PostSubject: Re: Fingerboard Bowl tutorial    Fingerboard Bowl tutorial  EmptyFri Oct 12, 2018 10:00 pm

yesterday i´ve heard another technique to shape a bowl. It is more simple (the concrete-part is the same) but i think you can be less creative (bowl size for example). you´ll need a salad bowl, building foam and a wooden frame. you can make a round pool with just one bowl for example. place the salad bowl upside down in the middle of the frame and spray the building foam over it. after it is dry (i don´t know how long it takes to dry) you can remove the salad bowl and do the cement-part.
i´m still thinking my way is better, but it´s up to you what you prefer.
Back to top Go down
skatemaster231
Moderator
Moderator


Posts : 1409
Join date : 2013-04-22
Age : 24
Location : internet
Setup : D͐̏̋̐ͣ̐͊́͂̈́ͨ̏̋ͥ̆͑ͧ͘͜҉̺̙̹̞̗͚̤̻̫̼̳͖͔̩̤̘͇o̚­­̱̰̳̟̟̞̜̖̬̌ͦ͌͂ͦ̎̅ͫ̑͂ͦͩ́̚͢ ̴̮͍̲̖̖̤̯͎͎͋̈́ͫ̂̊̇ͤ̆̓̌ͫ̐ͣͣ̆ͬ͌̚͡y̆ͪͫ̉ͭ̅ͫ͊ͩ́­­̨̛̬̠̰̙̫̮̪̟͈̯̘͎̗́̀o̶̶̘̝͇̜̝͓̞͉̰̫͚ͣ̽̄̀ͅu͗̊­̏­̷̡͙̜̳̠͈͕̹͑̿͌̓̇̽͂̄͋ͯ͂̍ͣ̂̓̀͘̕ ̣̳̭̝̻̣̤̫̣̠̦̙̦̲ͣ͂̃ͦ̑ͦ̃͂ͣ̓̇͒̈͘͠t͒̎ͯ͐͂͛̏̈ͦ̐­­̴̼̖̫̞͔̺ͧͭ̅͊̾ͣ͒́̚̚͘̕h̬̖̙͙̰͖̺͛̾̐̃ͦͪ̏ͧ͌̓͘̕­͙­̟į̶̻͖̠̟͔̟̦̝̜̞̄̇̏̂ͨ̋͂̕͟͝nͨ͌͊̓̆̾͛̏ͬ̑̎̾̚­ͭͮ­̵̌ͫͩ҉̶̵̰̫̩̲͕̱̗͚͇̰ͅk͙̳̳͓̟̝̠̯̝̔ͧͤͩ̾̀͢͢͠­͙̻͙­̻̱̼͖ͅ ͥͫ͒ͧ̏ͯͮ̓ͬͯ̾̽̈̀ͥ́̀͘͠҉͈̩͍͔̲͖͔ț̶̛̛̅͌̋ͬ͌̄͜͞­­͎̜̜̰͙̰̝̝̦̪̜h̸̥͎̰̤̼̱̝̜̭̹͆̾̈̓̌ͮ̎̅̄̅͋̋̔̿̚̕­͖­̱̗̗̪̫̻i̡̩̬̰̹̩͓̩̣̱̗̹͑ͧ̾̿̂̚͟͡ͅs̐ͤͭ̐ͫ͋ͮ́҉­̢͏­̳̦̠͕̠͈̣͕̫͔̫͖͖̹̗̟͢ ̴̠͓̺̩̩̙̬̬͈̼̭̰͖̱̺̣̗̫̉͂ͪ̔̍̀ͫ̀̎̏̔ͯ̌̒̒ͩͧ́i͛͋­­̸̄̂͊͋͗͑͏͙̙͈̦͎̥̰̕s͂̍̑ͫ́̇͌̑̿̒ͦ̓̊͛̚̚̚҉́̕͞͡­̞­̟̣̻̲̜̫̺͉̠̬̥̙̜̪̭ ̧̖͔͕̹ͧ̐ͦ̎̊ͧ̽ͨͦ̒͐̀͞͡ͅaͦͦ̅̐͐ͥ͂̓̋͒̔̄ͣͤ͂͂͆͊ͬ­­̨̛͈̞̪̖͓̣̫̰̠̤̖̠͉̪͔͟ ̡̛̱̦̗̫̯̻͓̭ͦ͒̐̒̆̇̉̀p̡ͤͮ͛ͫ͋̽̄̎̑͑̈̉̒͛̎͋̿ͮ̓͠­­͏͚̮̖͖̫̦͙͎̭̜͇̺̻̩̹̕r̴̵̡̟͖̫̝̘̜̝͇̙̦̍̆̃́ͦ̚͘͢­̝­̪̞o̷̧͔̪͙͓͔͓̞̘̺̟͇̳͎̦̩̣̻̩ͮ̅͊̉̽̄̍̋͐ͥ̓́͐̚͢­͓b­̡̥̞̳̙̠̞̘͉̼̤̘̝ͨͣ͌ͥͤ̍̓ͩ́̈́ͨ̅̓ͧ̅͢lͭ̿͂͛̄͐̈­͗̑̓­ͭ͆̉͋ͩ̿̋̇͡͡͞҉͔̼̻̣̝̜̭̖͕̙͈͓̖ͅeͣ̂ͭͤ͑̏ͬͨ̓­҉̨̖͞­̼̹͉̹͈ͅm̛͛ͦ̾̉̋́̊͐͐̂̐̎̄ͯͤ̚҉̡̻̳̤̥̪͎̹͜ͅ­͔͉̝͍̫­͖̺͓̬͙?̥̣̼͇̟̰̙͉̜̌̊̔ͬ̔̊ͩ̍̂̐̂͐̌̋ͩͩ͛́͡­̦̟̥̬̩͕


Fingerboard Bowl tutorial  Empty
PostSubject: Re: Fingerboard Bowl tutorial    Fingerboard Bowl tutorial  EmptyWed Oct 17, 2018 5:02 am

https://www.instructables.com/id/DIY-Concrete-Sink/

If you take this method of casting a sink, you can cast your own concrete bowl xD
Back to top Go down
Harlekin
FBHQ Beginner
FBHQ Beginner
Harlekin

Posts : 93
Join date : 2016-08-20
Age : 42
Location : Munich, Bavaria
Setup : main set-up: 30mm world creative, BR-trucks with orange bushings, winklers, fbs-tape
2. set-up: 31mm flaked, chinatrucks and -wheels with washers, BR-tape
3. set-up: 32 mm planktoon, chinatrucks and big winkler-like wheels,
fbs tape

Fingerboard Bowl tutorial  Empty
PostSubject: Re: Fingerboard Bowl tutorial    Fingerboard Bowl tutorial  EmptyThu Oct 18, 2018 4:16 pm

cool, another method!  but i think (if i understood it correctly), it becomes very heavy this way. i have to put it on the wardrobe after using it, and with my version it´s enough sport for me  happy . But who wants to use it stationary can use this.
Back to top Go down
Sponsored content


Fingerboard Bowl tutorial  Empty
PostSubject: Re: Fingerboard Bowl tutorial    Fingerboard Bowl tutorial  Empty

Back to top Go down
 

Fingerboard Bowl tutorial

View previous topic View next topic Back to top 
Page 1 of 1

 Similar topics

-
» Fingerboard Mold Tutorial
» Tech Deck Tutorial: How To Nollie On A Fingerboard!
» Tech Deck: How To Lazer Flip On A Fingerboard Detailed Tutorial!
» "The Harry Yeates Fingerboard Show" - A Live Fingerboard Stream
» King Of Fingerboard 2013 - Brazilian fingerboard contest

Permissions in this forum:You cannot reply to topics in this forum
Fingerboard HQ :: Fingerboarding Discussion :: Fingerboarding Discussion & News-