Subject: Huge Mini Ramp Tutorial Sat Jan 03, 2015 10:08 pm
I've been working on this massive mini ramp for a while now and thought that I would make a kind of "how to" tutorial out of it. I hope this helps people who are looking to build project themselves and who are looking for guides.
Step 1
Have an idea in mind before you start. It's usually best to sketch out a plan on paper or have a general idea of what you want to make in your head before you start cutting and sanding. Not to say that you can't build a masterpiece by just improvising, but the main thing is that you want to have a plan.
I have mentioned before on here that you can find great building materials by being opportunistic and keeping out an eye for when people are discarding perfectly usable things. One day I ended up picking up a top of a desk and thought "that looks like it could be a gigantic mini ramp!". Often I get ideas of what I want to make simply by just looking at what pieces of wood I have available.
The smaller pieces of wood next to the big one will be used for the front and back ends of the ramp.
Step 2
Start working out what the dimensions will be of the final ramp. How big will it be? How long will it be? How do I want it to feel when I skate on it? Sometimes this is the hardest part because sometimes if something is too tall or too short it makes skating the obstacle feel awkward. Sometimes you just have to use your fingerboard intuition for the best results. For this build I wanted to make my curves on my mini ramp more mellow than usual.
Many times people make their quarter pipes by using a string with one end tied to something stationary and the other end tied to a pencil and then drawing out the arc of the circle that this makes. While this is sometimes a great method I decided to just free hand my curve to gain that more mellow feel.
Step 3
Once you have the shape of the curve that you want use some thin wood and make a stencil out of it. I actually have tons of stencils from all of the ramps that I've made and I keep them because if I make a ramp and find that the dimensions are really nice then all I have to do is pull out my stencil of that ramp and then I can make another one just like it.
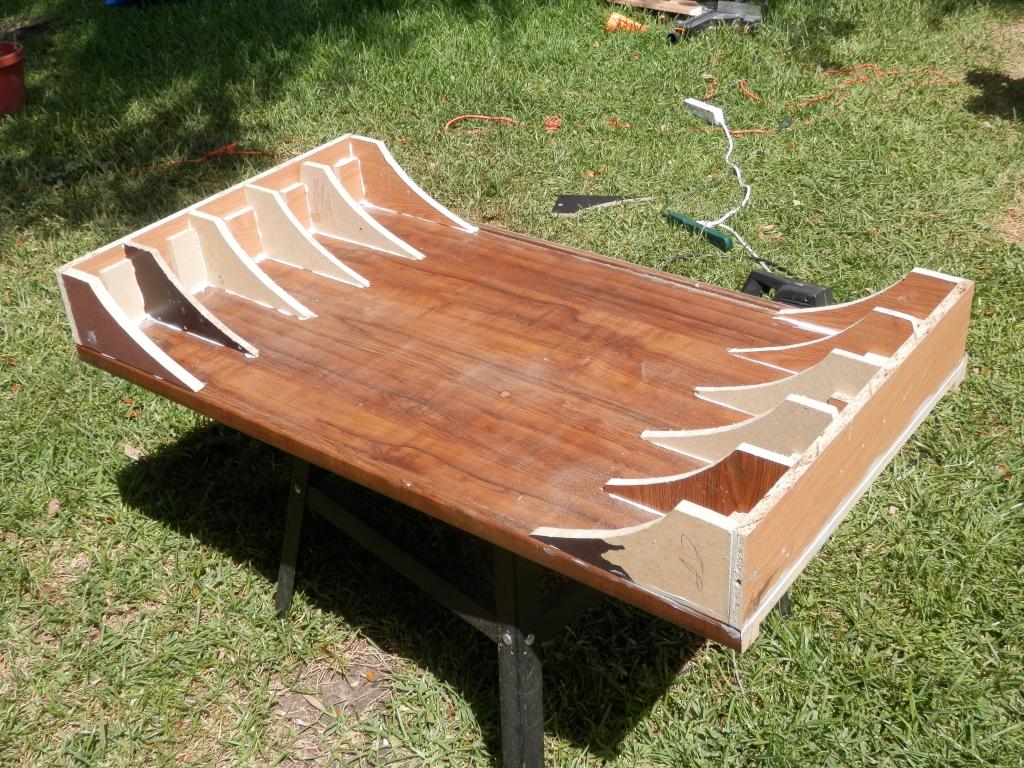
Here I have used my stencil to make 3 drawing on another piece of wood. When these are cut out they will make up the sides of the ramp as well as the ribs which will provide support for the whole ramp. Notice how I positioned them in a way such that the bottom and back parts are on the already cut straight edges of the piece of wood. I did this because sometimes cutting straight lines is difficult and its important that all of these pieces lay flat on the mini ramp base board.
Step 4
You will also need some tools for this project as well. I cut these pieces out with a jigsaw with a wood cutting blade. You may be able to use another tool for the same job, but a handheld jigsaw will definitely come in handy while building things. If you don't have one then you can pick one up at your local hardware store. If you are really on a budget you can always go to a pawn store and pick up a used one.
Keep in mind that when you cut these out that its important to know if you are going to cut them exactly on the pencil line, above the pencil line or under the pencil line. Believe it or not this actually matters so make a note somewhere on how you are going to cut these out so that they are as close to the template as possible.
Also note that I was able to squeeze 3 shapes out of this one piece of wood, but if you notice they do overlap at a point. This can be done anyway because you can sneakily cut off the thin part of one shape and put that piece in the middle of the ramp where nobody would ever notice that this one tiny cut off is actually missing.
Step 5
I chose to build this outside in my backyard so that I don't have to clean up any saw dust. Now you want to have something to place your build on. Here I chose a metal stand that I had in my garage, but anything will do. I personally like using saw horses.
To get the back and front side pieces cut nicely I used a table saw that I picked up off of craigslist for $70. You could use a jigsaw to accomplish, but its nice to have something that can cut long straight lines.
Once I have all my pieces cut its now time to assemble this thing! Many ramp companies use nails to hold wood together. Since I mostly use particle wood, nails really don't work that well. Screws work pretty good, but in this case I didn't use even screws. Well then, what did I use? I used glue, but not just any glue. I glue stuff together with the glue that comes in tubes that you use with a cauking gun. I mostly use the brand Liquid Nails and once the glue dries its a very strong bond and it works quite well.
You can see the rib pieces are spaced evenly through out the ramp and there are even other pieces of wood that I glued in there simply as supports. Even though this probably weighs down the ramp to have these extra pieces in there I personally like my ramps to be exceptionally strong.
Step 6
Once everything is dried its now time to think about putting down the top layer of wood and the coping. My choice for this project is actually a bamboo rug. Why? Because my local Ross store sells them for $20 and after I cut out the piece I need I will still have left overs for other projects. Not only that but since these rugs are segmented into individual slats of wood you don't have to force a normal piece of wood to bend on the curved parts of your ramp. It also makes it easy to cut too because the rug is already "cut" for you in one direction.
This requires taking off the back part of the rug though. I used a razor blade and simply cut all of the cloth parts off the rug so that only the wooden parts are left. In my ramp I cut out 3 separate pieces of bamboo rug. The big piece is 1 part and the top parts on the outer edges make up the other 2.
You also want to leave a little space for the coping to rest too. I got my round coping from Home Depot but any hardware store will do. The coping was cut out using a metal jigsaw blade with the jigsaw.
Once I got everything looking the way I wanted it to I got out my liquid nails and glued down all of the bamboo pieces and coping.
Step 7
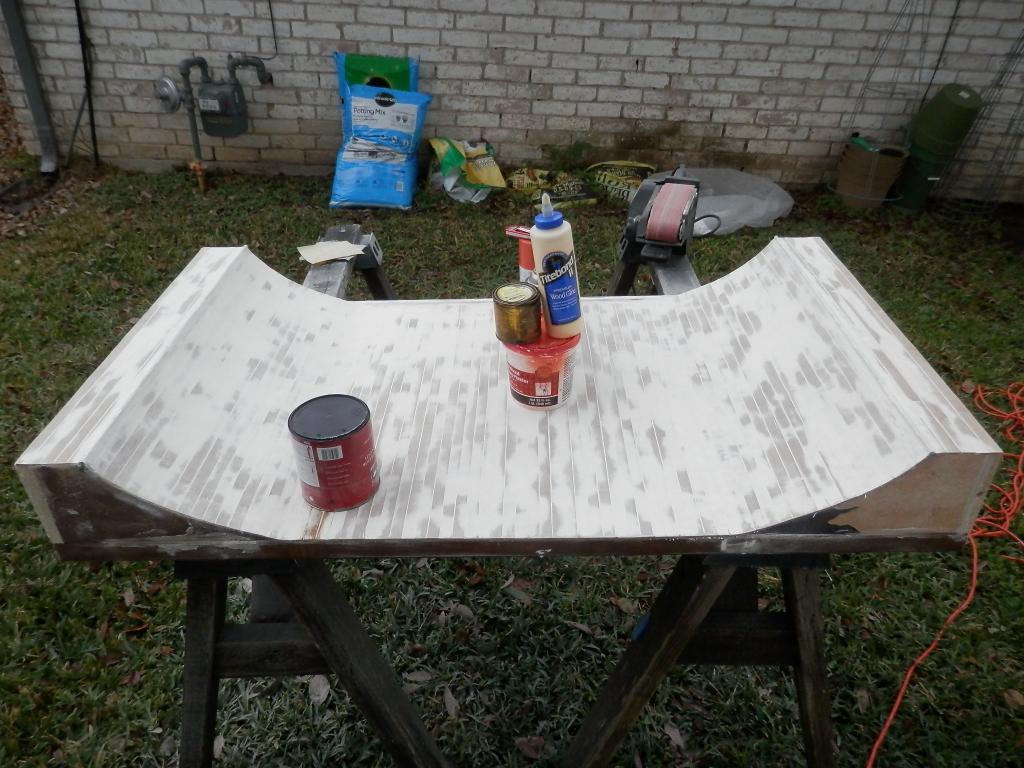
At this point I could have just glued everything down and pretty much called it a day, but nope. I had to mess with it. The mini ramp was looking very nice and probably only needed sanding, but you know what I did? I tried to go the extra mile and make the surface super smooth so I got out some spackling putty and covered the whole thing in this filling in all cracks and such.
One reason I did this is because the bamboo mat isn't exactly perfectly smooth. It has bumps and high and low spots so to even it all out I used the putty.
Now that the putty has dried I got out my hand sander and used a medium grit sandpaper and just sanding down the whole thing. When I did this I noticed 2 things that needed fixing. There were two spots where the bamboo buckled creating high spots. This was fixed by using a razor blade and cutting down the center of the buckle and then trimming off some of the extra wood so that both pieces lay flat like they should.
And this is where I'm currently at in the project. The items on the ramp are simply here to hold down parts of the bamboo while the glue dries.
Step 8
Next I will keep sanding down the ramp until it is super smooth. I usually start with medium grit then move on to fine grit sandpaper. Once I am satisfied with how it looks and feels I will use some wood stain and turn the white putty into a more natural wood like color and once this is done I will use some rub on poly urethane for a few final coats. To touch it all off I will probably paint the sides black.
I will post pics of the final steps once I actually finish them.
And there you have it. One person said to make a spine in the middle of the ramp because its so big, but I decided not to because I just wanted one of those really big mini ramps where you can do almost anything on it and not feel cramped.
Last edited by Pureskate on Sat Jan 03, 2015 10:34 pm; edited 1 time in total
Fujykky FBHQ Regular
Posts : 422 Join date : 2014-05-01 Location : Finland Setup : Cowply 33mm
wide brts/med oringz&witchcrafts
Nolliewheels little stones
mob grip
Subject: Re: Huge Mini Ramp Tutorial Sat Jan 03, 2015 10:15 pm
love it ! and the big space gives you room to add bench etc to sesh with
woob Constant FBHQer
Posts : 1305 Join date : 2013-05-22 Age : 33 Location : ¯\_(ツ)_/¯ Companies : woob Setup : woob
Subject: Re: Huge Mini Ramp Tutorial Sat Jan 03, 2015 10:28 pm
JessM Supporter
Posts : 1271 Join date : 2013-06-07 Age : 28 Location : Jersey Setup : honeycomb, g6a's, fbs, td wides
Subject: Re: Huge Mini Ramp Tutorial Sat Jan 03, 2015 10:57 pm
i want
GeraldineMilne FBHQ Regular
Posts : 425 Join date : 2013-06-16 Age : 28 Location : New York Companies : Teak x GrindSir
Subject: Re: Huge Mini Ramp Tutorial Sun Jan 04, 2015 3:16 am
Eric, your ramps are always: 1. Really epic 2. Massive in size 3. Ridiculously fun to sesh
Props on this project, it looks awesome
Joe Connelly FBHQ Regular
Posts : 548 Join date : 2014-02-25 Age : 28 Location : CT Setup : cozy with cool guy wheels and trucks
Subject: Re: Huge Mini Ramp Tutorial Sun Jan 04, 2015 4:11 am
10/10 do want
joe.l FBHQ Beginner
Posts : 6 Join date : 2014-12-31
Subject: Re: Huge Mini Ramp Tutorial Sun Jan 04, 2015 6:02 am
So sick
razpotnik Blossoming FBHQer
Posts : 310 Join date : 2013-07-14 Age : 25 Setup : fuzion
china trucks
china wheels
Subject: Re: Huge Mini Ramp Tutorial Mon Jan 05, 2015 5:08 pm